X-OCN Workflow Guide
In early 2022, Alister Chapman was one of the first to shoot in 8.6K with Sony’s VENICE 2 cinema camera. He was genuinely surprised at how easy it was to work with the resulting 8.2K footage. Now he shares with us his tips on using X-OCN in DaVinci Resolve.
X-OCN Introduction
X-OCN (eXtended tonal range Original Camera Negative) gives you all the benefits of a raw workflow but without huge file sizes normally associated with uncompressed raw. It takes everything that the sensor captures and uses a clever encoding process to store that information in a user friendly, compact, 16-bit MXF file.
The 16-bit scene linear files ensure that you are recording every nuance and every subtle texture that the camera can deliver, maximizing your grading and postproduction possibilities. At the same time the compact file size delivers a fast and efficient workflow. Transfer times are faster and storage requirements significantly reduced compared to other uncompressed workflows. X-OCN files are computer friendly, allowing for fast workflows even with modest postproduction hardware.
There are 3 X-OCN variants with X-OCN XT capturing at the highest quality level, ideal for demanding visual effect works; X-OCN ST is the standard quality version suitable for most applications, while X-OCN LT is ideal when you need even smaller file sizes, yet it still preserves the phenomenal picture quality and processing flexibility provided by 16-bit Scene Linear.
16-bit encoding is particularly beneficial for 16-bit linear OpenEXR and ACES. It is supported by many edit and grading applications including Blackmagic DaVinci Resolve, Assimilate Scratch, Filmlight Baselight, Avid Media Composer, Adobe Premier and many others. In addition, Sony’s Raw Viewer software can be used to transcode X-OCN to other formats when required.
X-OCN is a very easy and very flexible format to work with. Metadata that reflects the setup of the camera is recorded alongside the image information. In post-production this metadata is automatically applied to the 16-bit linear recordings so that what you see in the edit or grading suite accurately reflects the way the camera was set. However, in post-production you can override the metadata settings for colour temperature, Exposure Index and sharpness etc* to alter the way the data is processed. This gives a tremendous degree of flexibility while retaining the exceptional quality of the 16-bit recording.
*The controls available depends on the software used.

Working with X-OCN in DaVinci Resolve
The X-OCN footage can be imported directly into DaVinci Resolve using the built in media browser or by drag and drop from the Mac Finder or Windows File Explorer into a Resolve project. There should be no need to convert or transcode it to other formats.
- If you do require proxy files it is recommended that you allow Resolve to generate the proxy files.
- (When working with X-OCN in DaVinci Resolve the following settings can be directly adjusted via the ‘Camera Raw’ settings: White Balance, Colourspace, Gamma, Lift, Gain, Contrast, Colour Temp, Tint, Gain, Exposure, Sharpness, Highlights, Shadows, Colour Boost, Saturation, Midtone Detail).
- If you are using ACES leave the ACES Input Transform as “No Input Transform”. Do NOT select the legacy “Sony RAW” input transform. Resolve will read the X-OCN file metadata and set the correct input transform for each clip.

Image above: The Colour Management Settings for an ACES project using X-OCN.
- Once imported you should be able to edit and grade the X-OCN clips without needing to change any other settings. In a non-colour managed workflow the X-OCN clips are normally decoded to S-Log3 with SGamut3 or SGamut3.cine as determined by the camera settings, so you should use LUT’s designed for S-Log3/SGamut3 (.cine) as appropriate.
- If you need to change the white balance or exposure of a clip, or any of the other debayer decode settings these are found in the colour room under the “Camera Raw” tab. By changing the “Decode Using” setting to “Clip” you can access all of the raw decode controls. In most cases where an exposure or white balance change is required the quality of the final output will be higher by making any large adjustments via the decode controls rather than grading.
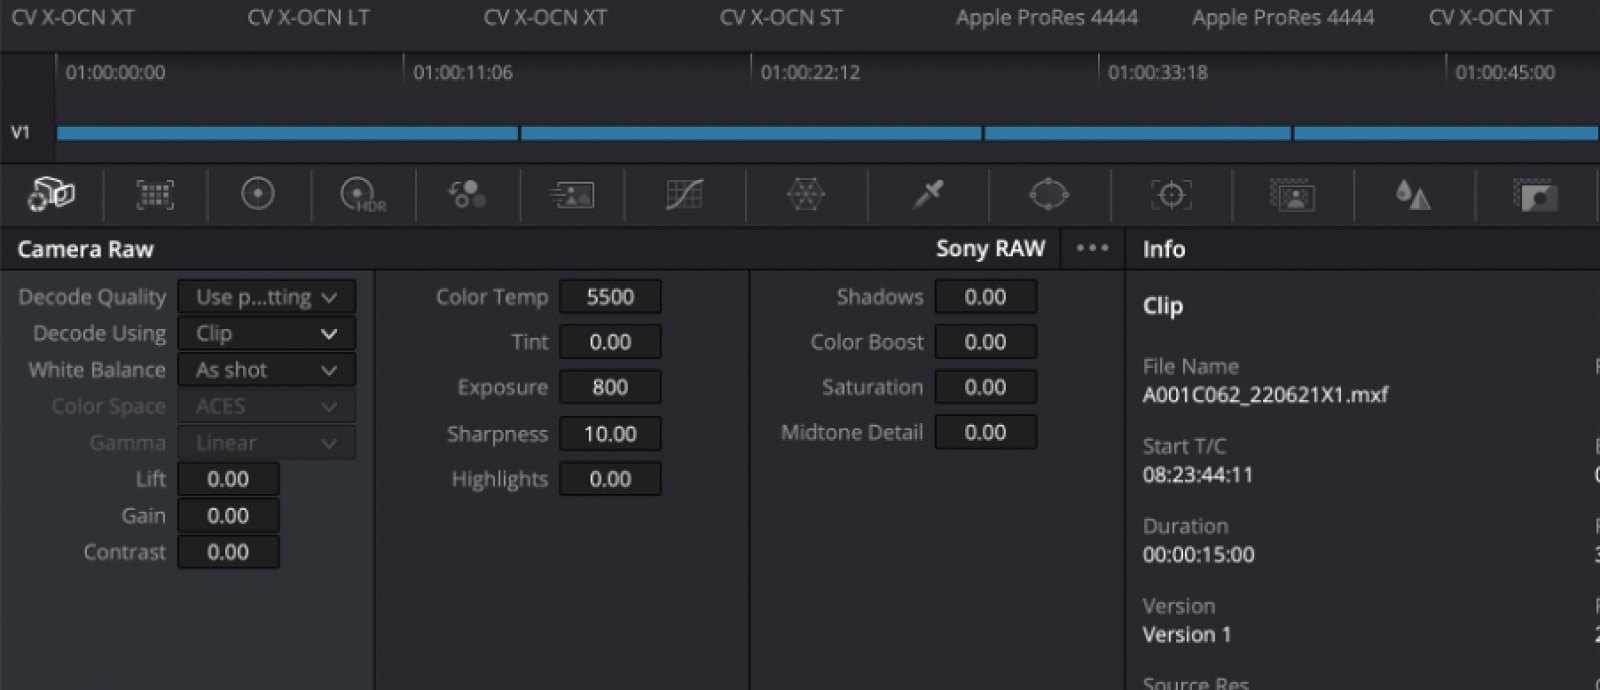
Image above: The camera raw settings in DaVinci Resolve.
- You can also change the X-OCN decoder settings for each clip under the ‘Camera Raw’ tab. On a low powered grading system or for very complex projects it may be beneficial to use a lower resolution decode to reduce the processing requirements. The decode settings can also be changed for the entire project by going to the ‘Project settings’, ‘Camera Raw’ and under the ‘raw Profile’ selecting ‘Sony Raw’. Note that the ‘Full Res – Sony’ setting is recommended for the very best image quality, but is not as efficient as the ‘Full Res – Resolve’ setting.

Image above: The raw decode settings can be changed for each clip in the raw decodes settings.

Image above: The global raw decodes settings can be changed in the Project Settings under Camera Raw when the Sony Raw Profile is selected.
- It is important that upon completion of your project, before exporting your final files remember to set the decoder to Full Resolution or select the “Force debayer to highest quality” option under the Advanced tab in the render settings.
When working with ProRes files in DaVinc Resolve and most other edit applications, by default the ProRes files are treated as ‘legal range’. However, S-Log3 files are always recorded using ‘Full Range’. So, when working with ProRes S-Log3 material in DaVinci Resolve you should right click on the ProRes clips and use the ‘Clip Attributes’ function to set the Data Range to ‘Full Range’. This is only normally necessary for ProRes clips. X-OCN and XAVC clips are correctly handled.
Workflow tools supporting X-OCN
X-OCN is supported by leading non-linear editing software tools such as Adobe Premiere CC, Apple Final Cut Pro X via Calibrated{Q} Sony RAW Decode plug-in, Avid Media Composer via nablet Sony RAW AMA plug-in, Blackmagic DaVinci Resolve, Colorfront OSD and FilmLight Baselight, to name a few.