FS5 RAW shooting tips
Alister Chapman explains why RAW is a big deal for Sony\’s PXW-FS5 and what you need to do to make the best use of it.
Upgrading the PXW-FS5 to shoot RAW doesn’t require sending your camcorder away. Simply ensure you’re on the latest firmware – Version 2 or higher – and purchase the CBKZ-FS5RIF upgrade. This comprises a special code number and instructions on how to go online to generate the unlock key specific to your camera.
With conventional video recording, the camcorder takes the signal from the sensor and processes it to create the final look of the image (or it adds a log gamma curve to the video) and that’s what is recorded or output as a conventional video signal over HDMI/SDI.
[1] Add color gamma settings [2] Add compression
With RAW, we bypass most of the image processing and output unprocessed sensor data via the HDSDI output so it can be recorded with a compatible external recorder.
[1] Add gamma, color settings [2] Add compression
[3] 12-bit RAW data [4] External RAW recorder
Post-production flexibility
Using RAW, the image processing takes place outside of the camcorder and this gives far more flexibility to create a wide range of different looks in post production.
Higher quality images
The FS5 was designed as a lightweight, compact camcorder and internally can record 8-bit 4:2:0 UHD. But when we output RAW, we get 12-bit RAW sensor data which, with a suitable external recorder, means superior image quality.
Monitoring flexibility
When you shoot UHD internally, the FS5 is capable of two video streams. One stream goes to the recording, while the other can be used for the viewfinder, LCD or an external monitor. Unlock RAW and you get an additional stream. For example, you can have a 4K RAW output to an external recorder, while also having two internal streams to drive the viewfinder or LCD while recording HD internally on an SDXC card.
Enhanced super slow motion
You can also record super-slow-motion 2K RAW at up to 240fps continuously if your chosen recorder supports this, as well as bursts of 4K super-slow-motion using a burst recording mode.
How to get the best out of RAW with FS5
The benefits of RAW are substantial, but it’s important to understand how best to use them. The FS5 records UHD internally at 100Mb/s providing good quality content in relatively small, compact files. 4K RAW recordings are far bigger: around 3Gb/s with the majority of the RAW recorders available today. This is fine for high-end projects, but for practical purposes most people will make use of their external recorder to convert the RAW data stream to an alternative high quality 10-bit codec such as Apple ProRes. This offers some of the quality benefits of starting with the RAW data, but with a much smaller file size that makes it more manageable. The RAW output from the FS5 is 12-bit and that is significantly better than the 8-bit recordings you get in UHD. But it must be understood that 12-bit RAW is not as good as the 16-bit RAW available from high-end cameras like Sony’s PMW-F5 or F55 when used with the AXS-R5 or R7 RAW recorder.
12-bit RAW will give you great flexibility in post-production but it is very important that you expose carefully to get the most out of it. RAW is not a magical solution for poor lighting and it won’t give you any improvement in the camcorder’s low-light performance.
External recorder options
The FS5 is compatible with a wide range of external RAW recorders from different manufacturers. In this article, I’m going to take a look at just two examples:
• Convergent Design 7Q+ and how to record RAW
• Atomos Shogun Flame and how to record ProRes
Please research which recorder is right for you personally – this market changes very quickly, and by the time you read this, there may be other options available to you.
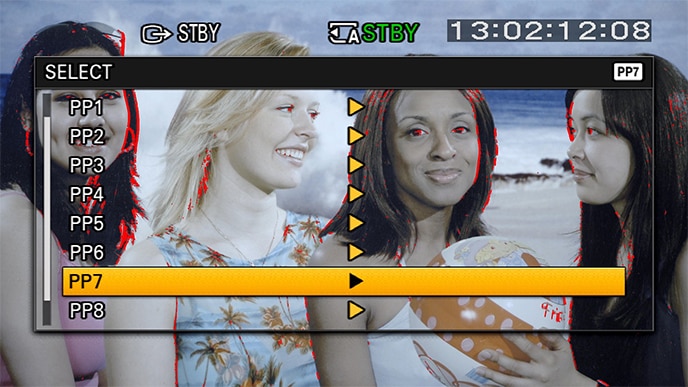
When shooting RAW you should set the camera to picture profile 7, which is S-Log2 with S-Gamut. This sets the camera to the correct gain/ISO and sets the RAW output level so that the recorder will be able to process it correctly.
You will need to choose the appropriate white balance manually within the picture profile depending on the scene.
For exposure, Sony recommend that S-Log2 should be exposed with middle gray at 32% and white at 59%. Personally I consider these minimums. You definitely don’t want to expose any darker than this because if you do, your pictures will be noisy and grainy. Ideally, you want to expose a little bit brighter than this. I like to do exactly the same for RAW. I find that I get the best results by exposing about one to one-and-a-half stops brighter than the Sony recommended minimums.
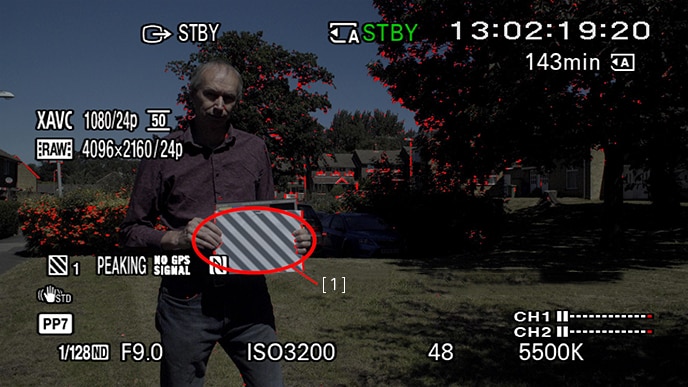
[1] 70% Zebras on white paper
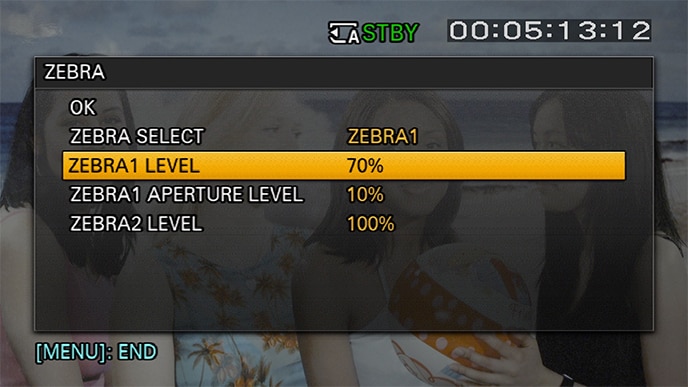
The easiest way to do this is to use a white card or a white piece of paper and set the cameras zebras to 70%. Then expose the shot so that the zebras are just starting to appear over that white piece of paper.
Another way to do it is to use the ‘AE Shift’ function in the camera menu to add a +1.5 exposure offset. Then you can press the one push auto iris button or a button assigned to the auto ND function to gain an exposure that is 1.5 stops brighter than the standard level and that’s going to give you a really good result in the vast majority of shooting situations.
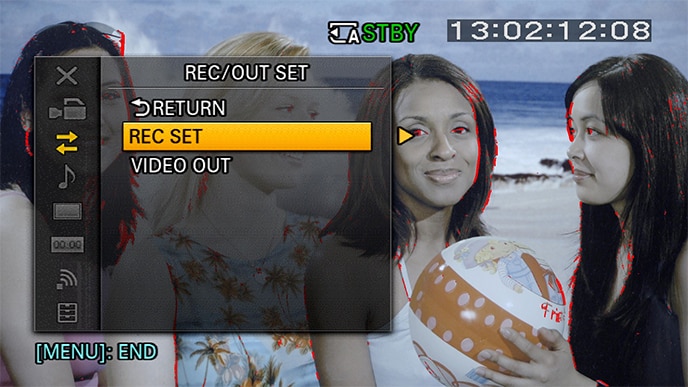
First of all we need to make some changes in the ‘REC/OUT SET’ menu page. Once you’ve enabled the cameras RAW option when you go to ‘REC-SET’ you’ll see that there are now some extra options under ‘FILE FORMAT’ in addition to the original options. You’ll see that you now have an option for ‘RAW and XAVC HD’. This option allows you to output RAW over the HD SDI and record XAVC HD internally onto the SDXC cards at the same time. Or there is simply the ‘RAW only’ option.
It is worth remembering that once you’ve turned on the RAW output, any monitor plugged into the HDSDI must be capable of decoding RAW data, otherwise you won’t get a picture. Next you need to go to ‘RAW OUTPUT FORMAT’ and choose the RAW format that you want.

Depending on whether the camera is set to 50i or 60i, you’ll see some different options ranging from 24fps up to 60fps for the RAW output. If you wish to record 4K RAW at 50 or 60 frames per second, you need to be very careful with your choice of recorder as many of them can only record RAW at up to 30 frames per second.
Recording RAW using a Convergent Design Odyssey 7Q+
On the Convergent Design Odyssey you need to go to the setup page where you choose the camera and select ‘Sony FS5’. Then select the ‘FS RAW’ option. The RAW data will be saved as a ‘cinema DNG’ file on the SSD.

To allow the camera to trigger the Odyssey to go into record, select ‘record trigger’ and set that to ‘camera.’ Now the camera will trigger the recorder when you press the record button on the camera. That’s it, that’s all you have to do to be able to record RAW on the 7Q. But you might want to consider adding a LUT (Look Up Table) on the Odyssey so that you don’t have to view the flat and low contrast S-log2 picture on its screen. To do this you press and hold the LUT option button on the Odyssey and that will bring up the LUT menu. Choose the preset LUT’s and then scroll down until you see the various Sony LUTs. The LUT that I recommend using with the 7q is either ‘Sony_EE_SL2_L709A-1’ or ‘Sony_EE_SL2_L709A-2’. These LUTs deliberately make the on-screen image a little bit darker. The darker on-screen image encourages you to expose the RAW data nice and brightly. The Convergent Design Odyssey can also convert from RAW to ProRes, but I’ll take a closer look at that type of recording using the Atomos Shogun as an example.

First you need to ensure that ‘Source’ is set to ‘SDI’ on the Shogun and set ‘Trigger’ to ‘Sony’. This will allow the camera to start and stop the recordings on the Shogun.
Depending on the options you have in your Shogun, you may be able to choose between different recording codecs. The default codec is Apple ProRes. Initially, you will be monitoring S-log2.
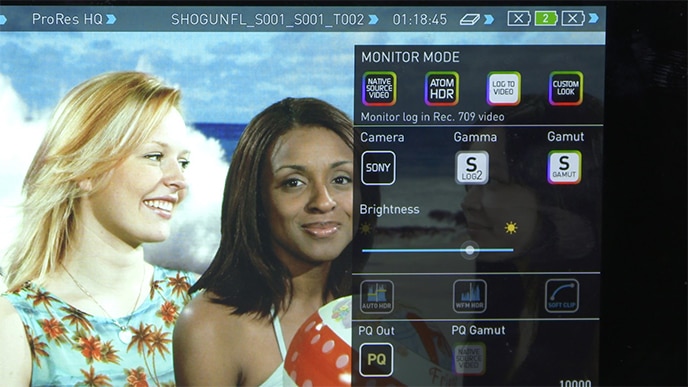
If you press the square yellow monitor mode button, you’ll see we have some different monitor options.
Choose ‘Log to Video’ and select ‘Camera’ – ‘Sony’, ‘Gamma’ – ‘S-Log2’ and ‘Gamut’ – ‘S-Gamut’. Now the S-log2 is converted to Rec-709 for monitoring. You still record S-Log2 and s-Gamut but, because you’re now monitoring using Rec-709, exposure and focus are easier to judge as the image has more contrast.
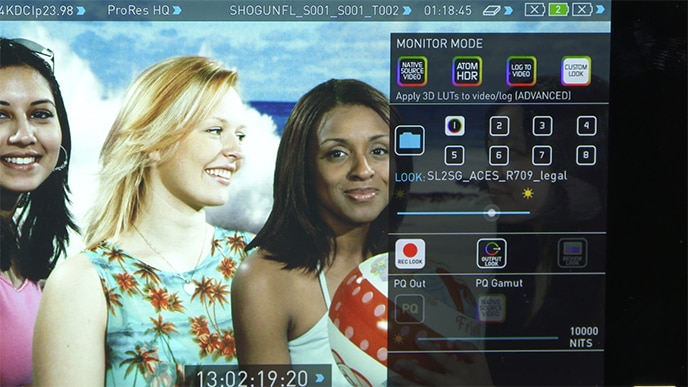
If you go to the ‘custom look’ page of the menu, the custom look function on the Shogun allows you to load your own look-up tables into the Shogun and apply those to the S-Log2 picture. You can then either just monitor by that lookup table or, if you choose the ‘Rec Look’ option, you can record the material with that look already baked into it. Do remember though, if you are baking in a look you are no longer recording S-Log2 and you may lose some of your post-production flexibility.
A worthwhile investment?
As you can see, there are lots of ways of recording RAW from the FS5. Exactly what you will be able to record will depend on the recorder that you choose, but in most cases it’s going to allow you to record at least 10-bit if not 12-bit and usually up to 60fps in full DCI 4K. It also gets around many of the internal limitations of the camera and for that reason I think this is a really useful addition to the PXW-FS5.
Additional information
A veteran broadcast cameraman with 20 years of experience, Alister Chapman runs his own company, Ingenious, which is a one-stop shop for video production, TV production and multimedia. The opinions expressed in this article represent those of the individual author who is independent of the Sony Group of Companies. Accordingly the contents of this article do not necessarily represent the opinions or policies of Sony Corporation or its subsidiary companies.


